Whipped Wax: Icing On Top of the Cake
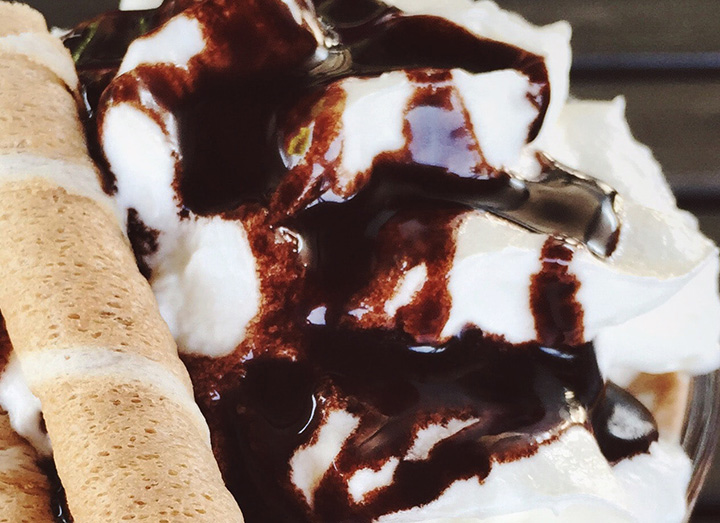
 You may be familiar with the technique of whipping wax. We’ve shared it with you before in our “How to Make a Snowball Candle” post. If you’re not familiar, the whipped wax technique is a great way to liven up any simple candle. We’ve seen people use this technique for a wide variety of candle projects, from cakes and cupcakes to foaming beverage candles, like the hot cocoa project below! It may take a little practice to perfect this technique. Whipped wax cools very quickly, so if you don’t work fast enough it can become unmanageable. Also, it is a VERY messy process, so be sure you have your old clothes on and are working on a surface that’s easy to clean!
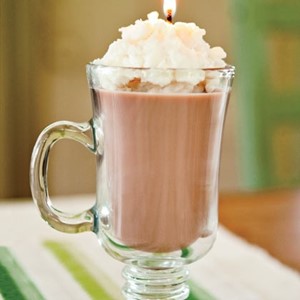
The Hot Cocoa Candle
*Project and photo credit goes to:Spoonful.com
What you need:
- 2 3/4 cups soy wax
- Pouring container
- 1/3 of a 3/4 ounce cube of brown wax dye
- 6 ounce glass mug (made for hot beverages) or a mason jar
- 9 inch tall prewaxed wire wick with clip
How to Make It
- Melt 1 3/4 cups of soy wax in a pouring container or heatproof measuring cup in the microwave according to the package directions. While the wax melts, chop the dye into smaller pieces and stir it in.
- Pour the wax into the mug and insert the wick
To Make the Whipped Cream:
- Melt the remaining wax and let it cool until it’s opaque, about 5 minutes.
- Whip the wax with a form until it begins to form frothy peaks. If the wax is too thin, wait a few minutes and try again. If it thickens too quickly you will need to remelt it.
- Scoop the whipped wax onto the cocoa. Let it cool, then trim the wick.
You can use the whipped wax technique for a variety of other candle projects! It will certainly be the icing on top of the cake!
Hi
I recently started make my candles with Igi 6006. I would like to make frosting (whipped wax) for my parasoy candles. When I first made candles I used 464 soy but I’ve changed to igi6006 for a stronger scent throw. But I wanted to know how can I make frosting (whipped wax) for my parasoy candles when creating strawberry shortcake candles with whipped icing on top .
When I made soy candles, I only saw that soy mixed with pillar wax was used or recommended to make the frosting. Is there a method or wax that can be added on top of my para soy candles?
Can I use my parasoy wax to make the frosting ? Or is there a wax that I can use with my parasoy to make frosting?
Please advise….
I love the whipped candles! But I am having trouble with them stay lit because there is so much wax. Should I put extra wicks so they don’t burn out from the excess wax?
Which wax is good for whipping?
Shema
A soft, natural, container-style waxes like, 444,464 soy wax and 454 soy coconut blend wax. They have a low melting point and are easier to whip into a smooth, frosting-like consistency.
How many times can you reheat the wax